Create a project in the installed iOS/Android app, then use the same record to follow the work. This guide uses the native form and its current English labels. A mobile browser runs the website; follow the web workflow there.
The fictional example is Replace entrance light at Jardines del Lago, assigned to the confirmed entrance common area. You will check that the saved project contains its description, location and files. Before starting, confirm your access to the correct community, permission to create and the information you plan to enter. For immediate danger, follow the community’s emergency process.
Check the community and available actions
Open the community that owns the work, then open Projects. The project keeps the description, location, supporting files and discussion together. Creating it records the work; it does not approve a purchase.
New project appears only when your account has permission and the installed app supports creation. Editing also depends on the individual project. If an action is missing, check the community and ask an administrator to review access. Use the website for actions unavailable in your mobile version; the mobile and web guide explains the differences.
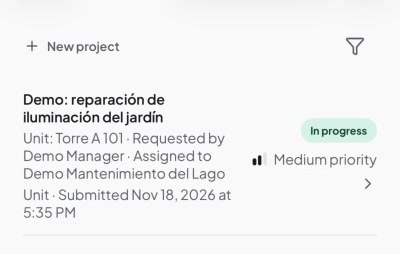
The iOS examples show existing projects and an unsaved form. Android screens can differ.
Create the project in three steps
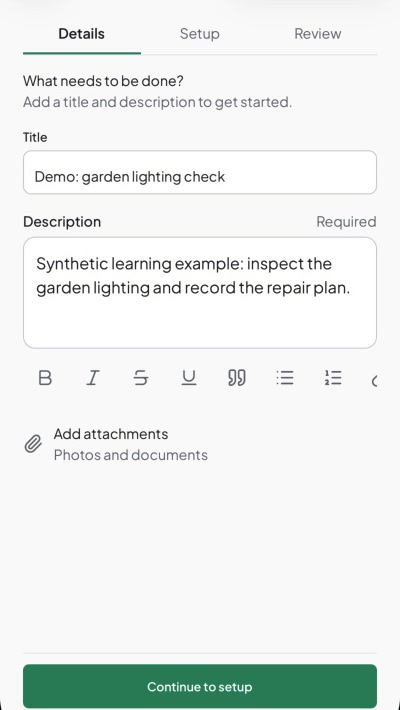
- Choose New project. In Details, enter
Replace entrance lightas the title and describe the condition, location, work needed, and useful context. For example, explain which entrance has a damaged light and when you noticed it. - Add relevant photos or documents. Check the selected files and their upload status. Uploading a file does not save the project.
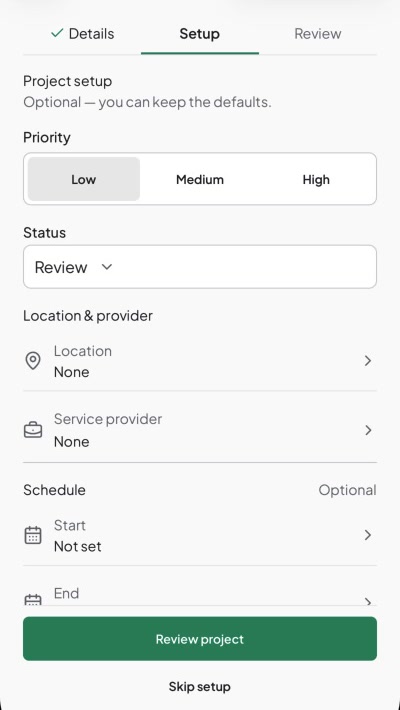
- Choose Continue to setup to enter Setup, where you can set priority, status, a unit or common area, a service provider, and start or end dates and times. For a unit, select its building first. Setup is optional: keep the defaults if you lack confirmed information, or use Skip setup to go to review with those defaults.
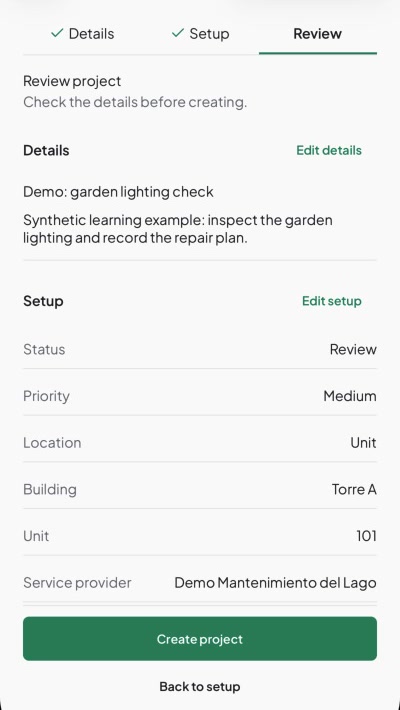
- Choose Review project. Check the description, location, provider, dates, status and attachments, including any defaults you kept. Use Edit details or Edit setup to make corrections. Not set means an optional field is unset, so it does not confirm an appointment or provider assignment.
- Choose Create project and wait for the saved confirmation. Open the resulting record and verify that it contains the intended information.
The end date cannot precede the start. Selecting a service provider supplies context; it does not by itself establish a contract or grant spending authority.
This unsaved draft uses a separate fictional lighting example. Continue to setup advances the form without creating a project.
Use Setup to review priority, status, location, provider, and schedule. This unsaved example still has no location, provider, or dates; the following review reflects additional choices.
This unsaved iOS review selects Torre A, unit 101 and a provider, rather than the entrance common area in the written example. Create project was not pressed.
Update the existing record
Open the project and choose Edit project from Project actions, when permitted. Review changes before choosing Save project. Keep progress updates and supporting facts in the existing discussion instead of creating another project for each visit or conversation.
When work changes hands, summarize what happened, what remains and who should act next under your community’s process. Check the current status; a comment alone does not prove that work is finished.
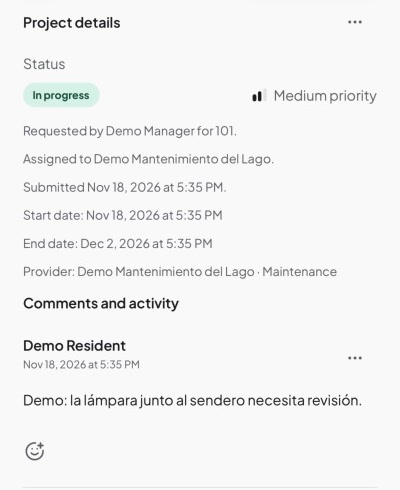
This existing example project and its fictional comment are separate from the unsaved draft above.
Recover without duplicating work
| Problem | What to do |
|---|---|
| Fields need correction | Correct the highlighted fields before saving. |
| Saving failed | Follow the retry controls on the current form. It can preserve the draft for a retry, but unsaved work may not survive closing or restarting the app. Read the discard confirmation before leaving with changes. |
| Attachments need another association attempt | Use the displayed recovery action instead of uploading the same files into a new project. |
| Connection failed and the result is unclear | Check the project list and any saved result before starting again. |
| A record disappeared after a permission change | Ask an administrator to review access instead of recreating the record to bypass the restriction. |
Check dates, location and attachments before submission
A project can use None, Unit, or Common area as its location. For a unit, choose Building first and then the actual Unit; a shared entrance belongs to its common area. Choosing another location can clear the earlier selection. Confirm the result on Review project, including the provider, before creating.
Use the start/end date and time controls only for agreed scheduling. Enter valid 24-hour times when the interface requests HH:mm; for example, 09:00. The end must be at or after the start. Check the displayed local times; do not assume a different device’s zone shows the same clock time.
If files are still preparing, wait for their state before pressing Create project. If the form reports rejected attachments, follow its recovery message. Leaving or switching accounts or communities can end the current draft context; do not rely on a temporary draft being available on another device.
Verify the saved result and follow-up
After Project saved, the app opens the saved detail. Check the title, description, location, dates, status and Attachments. Open a file to confirm your authorized account can access it, then find the same record in Projects. This confirms the project was saved; a completed upload alone does not.
When available, use Add a comment, enter the factual update and choose Post comment. Confirm the comment appears under Comments and activity. Posting a comment or acknowledging it does not change the project status. Use Edit project and Save project for permitted field changes, then verify the updated detail. Provider bills, estimates and finance actions have separate availability and permission checks; do not infer them from being able to post a comment.
If Project editing is not available for this project appears, confirm the current community, app support and permissions. Use the website workflow for supported web actions, while keeping the same record. For a missing saved record, ask an administrator about access or deletion instead of creating a replacement. Read record lifecycle before deleting anything.