Choose which notices you receive in your account, or recover alerts on the affected phone. Account preferences and phone permissions are separate settings. You can follow the web steps without sending a test message or changing anyone else’s settings.
Check which kind of notice you need
| Channel | What it means |
|---|---|
| In-app | An entry inside Urbira. |
| A separate delivery channel. | |
| Phone push | An alert that requires an eligible registered installation and operating-system permission. |
Enabling one channel does not guarantee delivery through the others.
- Open Notifications when you want to read notices already received.
- Open Notification settings when you want to change category/channel preferences. These are different pages.
- For a private conversation, check Messages too. Reading an inbox notice does not necessarily mark the conversation as read.
An old notice never grants access to its source. If access was removed or the record changed, open the current workspace to check what remains available.
Review your notification preferences
- Sign in with the account whose settings you want to change and open notification settings.
- Find the category row: direct messages, electronic signatures, calendar, projects, invoices, payments, invitations, community wall, or system notices.
- Check the Email and In-app columns. These are the two channels available in the web table; phone permissions and SMS are outside this table.
- Toggle one available switch. Changes save immediately; there is no separate save button. Wait for the saved confirmation before changing another preference.
- Reopen the settings page and verify the intended switch remains in its chosen state.
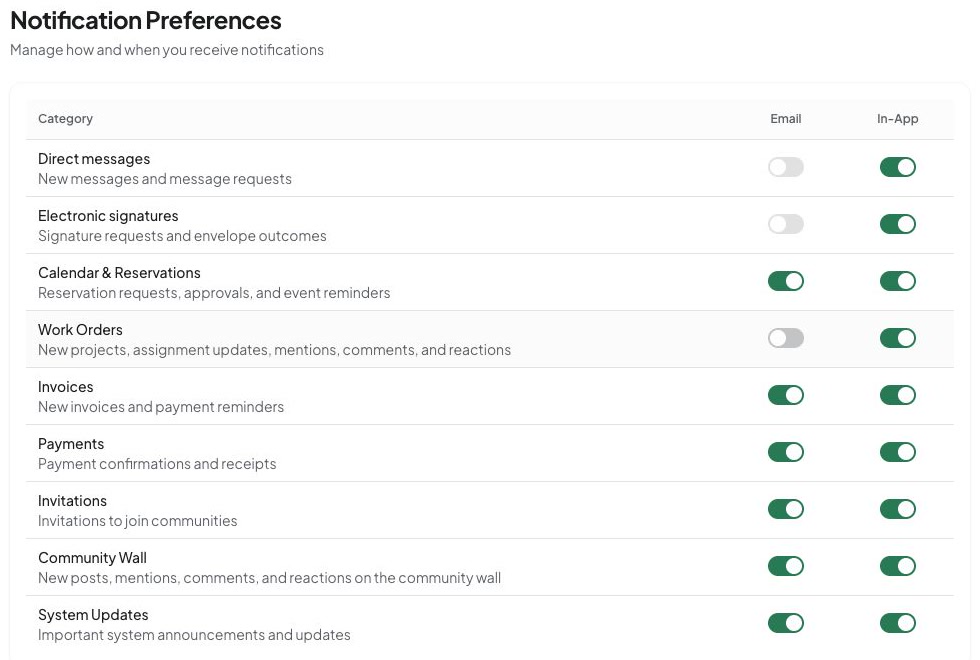
The Email switches for Direct messages and E-Signatures are disabled. Phone settings cannot enable an unavailable control. Use the available switches; categories may support different channels.
If saving fails, the switch returns to its previous position. Check the connection, retry when the page is ready, and verify the saved result. A temporary switch position does not confirm saving. These settings affect your own preferences; who receives an event still depends on participation, permissions, and the event itself.
This table shows category preferences. It does not confirm delivery to your phone.
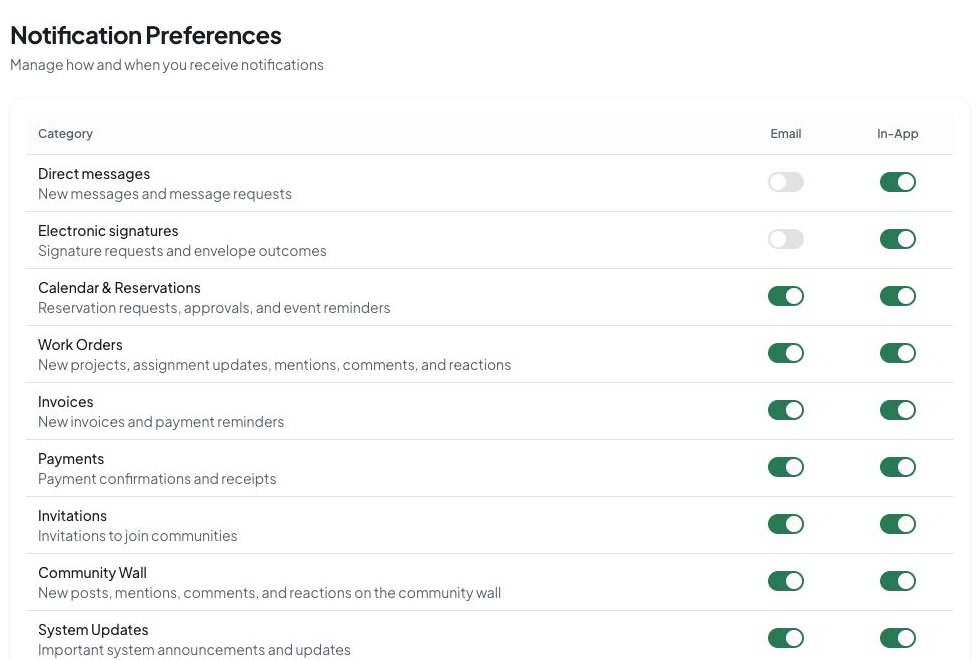
The example keeps project in-app notices on while email notices are off. Check each channel separately.
Recover alerts on this phone
Use the phone with missing alerts for these steps, on an app release that supports this alert recovery. A recovery notice in Messages refers to this phone, not the other participant’s device.
- Open account notification settings to inspect device status, or use the recovery notice in Messages when shown.
- If Enable notifications appears, choose it and decide whether to allow the operating-system permission prompt.
- If Open settings appears after permission was denied, enable notifications for Urbira in the phone’s settings, then return to Urbira.
- If permission is allowed but registration is incomplete, use Try again with a working connection and wait for the result.
- Recheck device status. Continue checking the app directly while delivery is unresolved.
Both permission and device registration are required. Recovery keeps your category preferences but does not guarantee a banner, sound, or badge. Alerts still depend on how the app behaves while open and the operating system’s display and sound settings. The web preference table does not register your phone.
Understand dismissal and missing alerts
Closing the recovery notice dismisses the reminder; it does not enable alerts or change your preferences. Check this phone’s notification settings if alerts are still missing.
For missing alerts, check in this order:
- Confirm the signed-in account and that the underlying activity exists in the app.
- Review the category’s preference and, for direct messages, whether the conversation is muted.
- Check phone permission, device registration, connection, and system presentation settings.
- Open the app directly and inspect the relevant inbox or record while you recover delivery.
Do not repeatedly resend a message or recreate an invoice to force a notification. A record may already exist even if its alert never appeared. If help is needed, describe the channel, device, and approximate time without forwarding credentials or private message contents.
Open the underlying item safely
- Select the notice and inspect the opened record’s community and current status.
- If it is unavailable, check your current membership and permissions. The notice does not grant access.
- If a direct-message alert does not open the expected thread, open Messages manually and choose the participant and community.
Native alert navigation varies by installed release. Use the private-messaging guide for requests, unread history, and mute controls; use the mobile and website guide when your screen differs. To verify the result, confirm that your preference remains saved or that the device status shows recovery. Closing the banner alone does not confirm recovery.