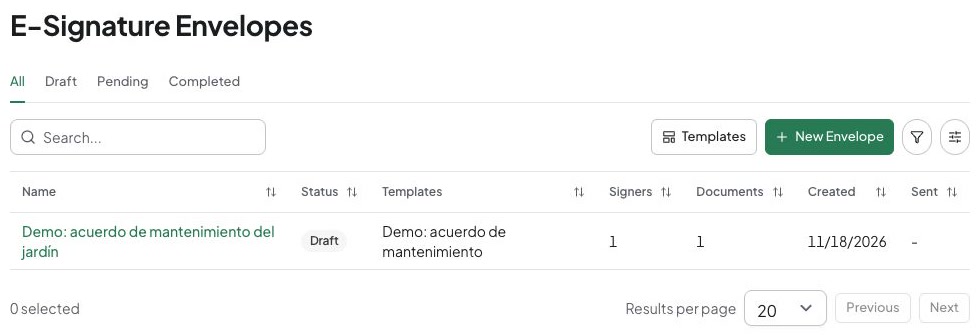
Start with a final PDF, save it as a reusable template, then create an envelope for the people who need to sign. The illustrated envelope is an unsent draft. For practice, use a fictional PDF and consenting demo recipients; send only when you intend to contact them.
Prepare the document and your access
- Open the correct community and its E-Signatures area on the website.
- Confirm you have permission for the intended template and envelope actions. If controls are missing, ask the account administrator to review access and service availability.
- Prepare the final PDF and confirm the names, email addresses, and roles of the intended signers outside this form.
- Check any applicable usage-credit notice before a metered action. See usage credits.
Templates and envelopes are separate records: a template stores the reusable document and field positions; an envelope is one signing request for specified people. Neither uploading the PDF nor creating a draft means it was sent or signed. Confirm your community’s approval and recordkeeping requirements before proceeding; the product workflow does not determine whether a particular signing method is appropriate for your transaction.
Create and check a template
- Open Templates, then New Template.
- Enter Template Name, for example
Demo maintenance authorization, and an optional description that identifies its purpose. - Upload the final PDF in Source Document (PDF). Check that the correct file was selected and wait for upload completion.
- Under Signer Roles, name each role required by the document, such as Owner and Contractor. Use Add Role for another signer role.
- Choose Create & Edit Fields. When the PDF loads, navigate every relevant page and use Add Fields to place signature, initials, date, text, checkbox, or dropdown fields as needed.
- Select each field. In Field Properties, check Assigned Signer, label, required setting, and any dropdown choices. Drag to reposition and resize without covering important text.
- Save and check that the unsaved-changes indication clears. Reopen the template and verify the fields and page positions remain as intended.
Review every page at a readable zoom. Check each field’s assigned role and position so the right person completes it. Correct any fields outside the page or on the wrong page; adding a signer will not fix their positions. Correct the PDF before using it if its actual wording is wrong. Updating a template is not the same as replacing an already-sent envelope.
Create and send the envelope
- Return to Templates and choose Use on the reviewed template, or choose New Envelope and select the intended template when offered.
- Enter Envelope Name. Add an optional Email Subject and Email Message appropriate for these recipients.
- Enter each signer’s Full name and email, matching the intended roles. Use I need to sign only when you must also participate. Review any added signer carefully.
- Choose Create Envelope and open the resulting draft.
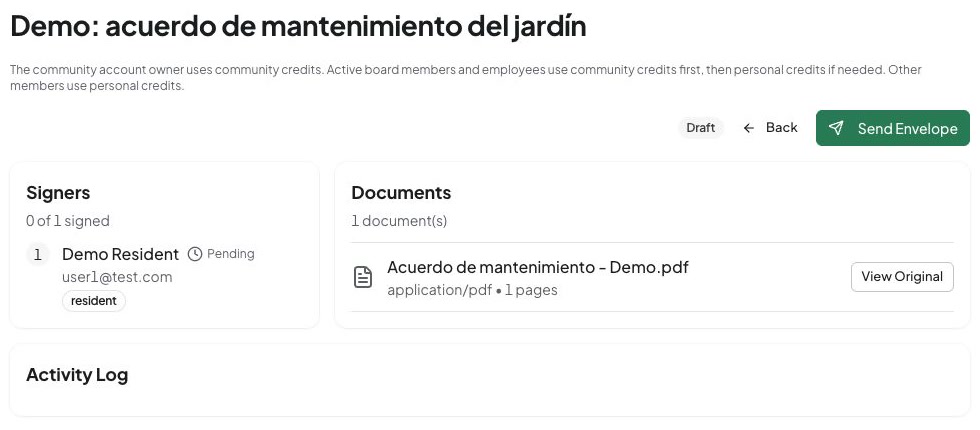
- Check the draft’s original document and signer list. Correct mistakes before sending; a draft is a safe point to stop a demonstration.
- Only when you intend to issue the request, choose Send Envelope, read any usage notice, and verify the resulting envelope status and activity.
Sending can involve external delivery and service credits. Do not use a real address merely to illustrate a screen. If the response is interrupted, reopen this same envelope and inspect its status before trying again or creating another envelope. Creating a second draft can produce a distinct request rather than recover the first.
This example envelope remains Draft, with no sent date. Sending and signing are separate steps.
Inspect the pending signer and document before sending. This example is still an unsigned draft.
Sign and follow progress
- Each recipient opens their own invitation and reviews the document and assigned fields. Keep invitation links private.
- Complete the fields and signing confirmation offered to that recipient only when ready to sign. A sender should not complete someone else’s signer identity.
- In the sender’s envelope detail, check Signers and the signed count. One signature in a two-signer envelope is partial progress.
- Review Activity Log for events and current envelope status. A sent email or viewed document is not a completed signature.
- After the envelope is completed, use Download Signed when available. View Original opens the source document, not the final signed copy.
- Open the saved signed document and keep it with relevant activity evidence under your community’s records policy.
An expired, voided, or already-completed invitation requires checking the recorded status, not repeated signing attempts. Provider capabilities vary; do not assume a separate downloadable audit certificate is always offered. Mobile preparation and management controls can differ; use the website for this tutorial and consult mobile availability.
Handle corrections and failures
For an active request that must stop, an authorized sender can choose Void Envelope and enter a reason. Read the confirmation and verify the new status. Deleting or changing a template does not withdraw an envelope already sent from it.
If the document preview fails, check connectivity and reopen the existing envelope; do not send another request merely to get a new preview. If sending fails or its outcome is unclear, inspect the same envelope’s activity and status first. Report persistent problems with the envelope reference and approximate time, without forwarding private signing links or document contents unnecessarily. Before finishing, verify the result of your work: a prepared draft or a completed envelope, depending on the steps you performed.