Scan a receipt for a payment already made, review the details, then save and confirm the payment separately. The fictional exercise proposes recording 40 DOP paid outside the app against the unpaid 75 DOP invoice for Torre A / 101 in Jardines del Lago. With no other payments or credits, confirmation should leave 35 DOP due. AI extraction does not verify bank settlement.
The saved fictional records also include a completed 250 DOP payment against a different, paid invoice. It does not support the proposed 40 DOP entry. Unit 101 has no assigned owner; reviewing its existing invoice and creating a new one have different prerequisites.
Before scanning
Use the website with access to the intended invoice or bill, permission to submit a payment, an enabled analysis service and sufficient analysis credits. Posting the payment later requires payment-confirmation permission. Have the actual amount, date, method, reference and billing address ready. These instructions cover the website.
Check the payment list and original obligation first. If the receipt already supports an existing payment, inspect that record instead of submitting another. Use a clean fictional receipt in practice, with no real banking or identity information.
1. Start in the correct payment form
- For the homeowner example, open Register Invoice Payment in the selected community. For a payment made to a supplier, open Register Bill Payment instead and select the correct provider and bills.
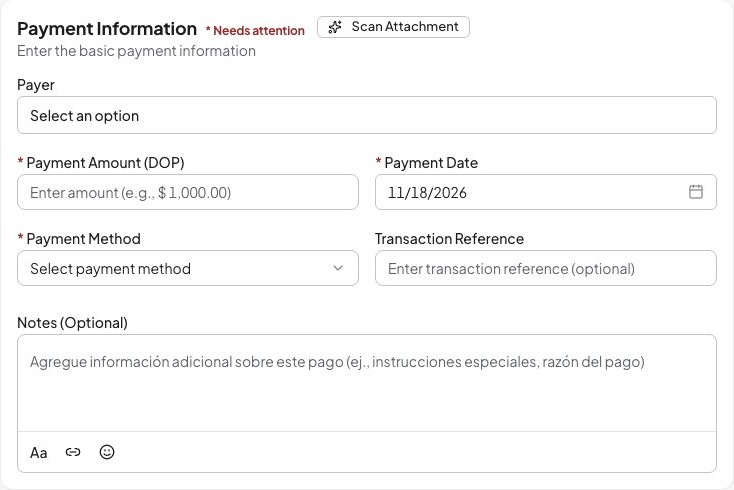
- Choose Scan Attachment in Payment Information. The sheet opens Scan Payment Attachment.
- Choose the receipt, confirmation or bank proof as a PDF, JPG, PNG or WebP up to 10 MB. Choose Upload and Parse, then wait for the review.
- You can also resume an unused completed receipt analysis through Documents. Its generic payment handoff goes to invoice payments; do not use it to assume the supplier/bill flow was selected. Return to the appropriate payment form when the obligation is a bill.
The unsubmitted payment form is the starting point; scanning is optional and does not confirm money received.
2. Review extraction before applying it
- On Review Parsed Payment, compare Payment Amount, Payment Date, Payment Method, Transaction Reference, payer, payee, notes and warnings with the original. A confidence percentage does not prove money arrived.
- Confirm the source currency. If conversion is needed, enable it and check a valid rate and recorded amount. Without conversion, numeric values are recorded in the community currency without changing the number.
- For the example, verify 40 DOP and the actual date/reference. If the analysis misses an amount, the review allows continuation so you can enter it in the payment form; do not treat a blank amount as zero.
- Choose Apply to Payment Form. This copies extracted details into the form. It does not create the payment, select all the correct obligations for you, or confirm the bank movement. Correct wrong fields in the payment form.
3. Complete and review the payment
- In Select Bills/Invoices to Pay, select the unpaid 75 DOP invoice and check its owner/unit and 75 DOP balance. For a supplier payment, verify the provider and each selected bill.
- Check the allocation against each selected document. Review the named Payer when offered or required; match the actual associated payer before recording an overpayment or credits.
- Confirm Payment Amount
40, date, method and transaction reference again. Complete required billing address fields and useful notes. - Read Payment Summary. For this example without credits, the cash component is 40 DOP, applied credit is zero and remaining due is 35 DOP. Do not count a prior credit and the receipt as the same payment twice.
- The scanned attachment is linked after a successful payment save, not merely by applying extraction. A credit-only settlement cannot include a scanned receipt; use the dedicated credit workflow for that case.
- Choose Pay, inspect Confirm payment, and use Confirm once when all values are correct. This records information about a payment already made; it does not initiate a bank transfer.
4. Check pending status, then confirm separately
- Open the created payment detail. Check its amount, reference, distribution and supporting attachment. Check Pending and the absence of a confirmation timestamp; form submission does not finish posting.
- An authorized reviewer opens the same payment and compares it with bank/source evidence. Choose Confirm, read the affected invoice/bill list in Confirm Payment, then choose Confirm there.
- Check Completed and the confirmation date. Return to the unpaid 75 DOP invoice and compare amount paid and remaining due. With no intervening change, 75 − 40 = 35 DOP due.
- If the reviewer cannot confirm, resolve permissions, service/subscription access or the payment’s current state. Do not create a second payment to work around the restriction.
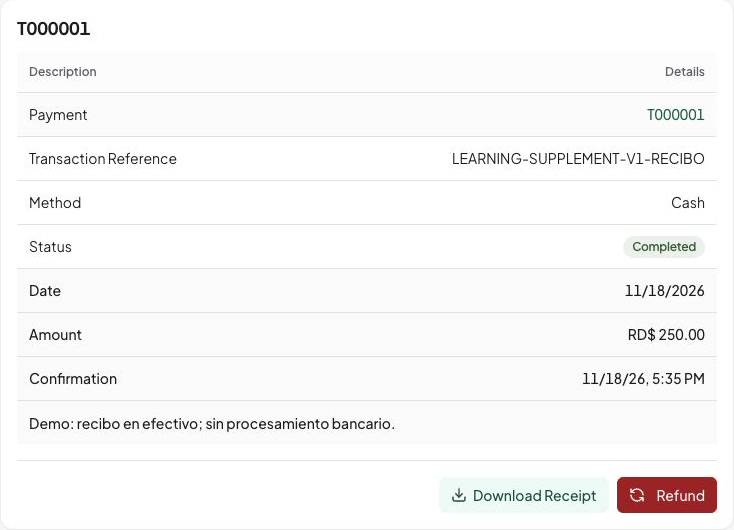
This separate example 250 DOP receipt illustrates a completed display state. It is not a newly recorded 40 DOP payment.
Resume or recover without a second record
Inspect the saved source and its status before resuming. You can reopen an unused, completed receipt analysis for review. A failed or processing analysis is not ready; one already used to create a payment is no longer an unused review. Re-analysis can consume credits.
If application to the form succeeded but you did not save, return to the form and inspect the saved analysis when available; recheck all fields and documents. If saving or confirmation was interrupted, check the payment list and detail before retrying. The payment may already have been saved or confirmed. For a used analysis, follow its created payment rather than reclassify or consume it again.
For an expired currency quote, refresh and repeat the final review. For unavailable analysis or insufficient credits, resolve the specific service restriction; manual entry remains a separate task requiring the same financial authority. Keep private receipt data and signed source links out of support messages. Next, see payment confirmation and balances and financial corrections.