Add a building and units to an existing community, then set up a team member’s role and check their access. In fictional Jardines del Lago, you will add Torre B with 101 and 102, add confirmed unit 103 separately, and prepare a limited maintenance role for Sam Vega.
Before you change an existing community
Use the website and check the selected community’s name. Submitting these forms changes live community records immediately. They do not use the saved creation draft. If you have not created the community, start with manual setup or assistant setup.
Creating buildings and units requires unit-creation authority. Check your permission for each task: creating buildings and units, editing unit details, changing structural fields, managing employees, and creating employee roles have separate permission checks. The community’s subscription and the relevant units, employees, or roles service must also allow the action. Read the explanation for disabled controls and resolve the restriction; do not create another community to bypass it.
Confirm building names, unit numbers, floors, and team responsibilities before starting. Creating empty units does not establish ownership, residency, or accounting. Employee invitations can send email, so check the recipient and role before submitting. These instructions cover the website; native support should be checked in the mobile guide.
1. Add a building and check generated units
- Open Units in the selected community. Look through existing buildings and pages so you do not add Torre B twice.
- Choose Create Building in Add another building.
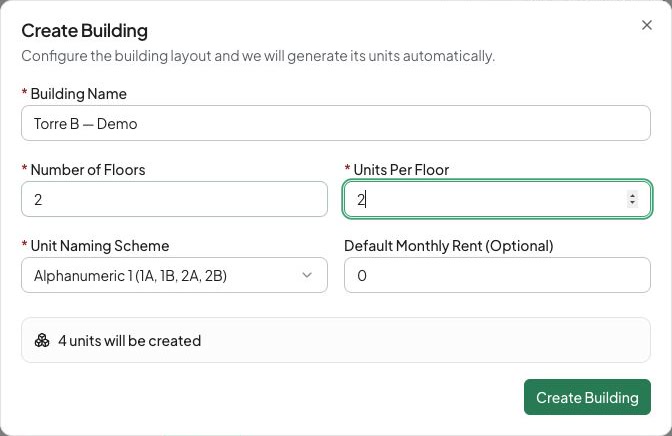
- In Building Name, enter
Torre B. Set Number of Floors to1and Units Per Floor to2. - Choose Numeric (101, 102, 103, 104) in Unit Naming Scheme. The pattern label gives sample numbers. With these values, the summary should say 2 units will be created.
- Leave Default Monthly Rent blank unless you have a confirmed reference amount. It does not create a lease, invoice, or payment.
- Choose Create Building once. Wait for the updated building list, then find Torre B and verify units 101 and 102 on floor 1.
Use a generated layout only if it matches the building. For irregular additions, use the individual unit form below. Check the complete list against your records before inviting anyone.
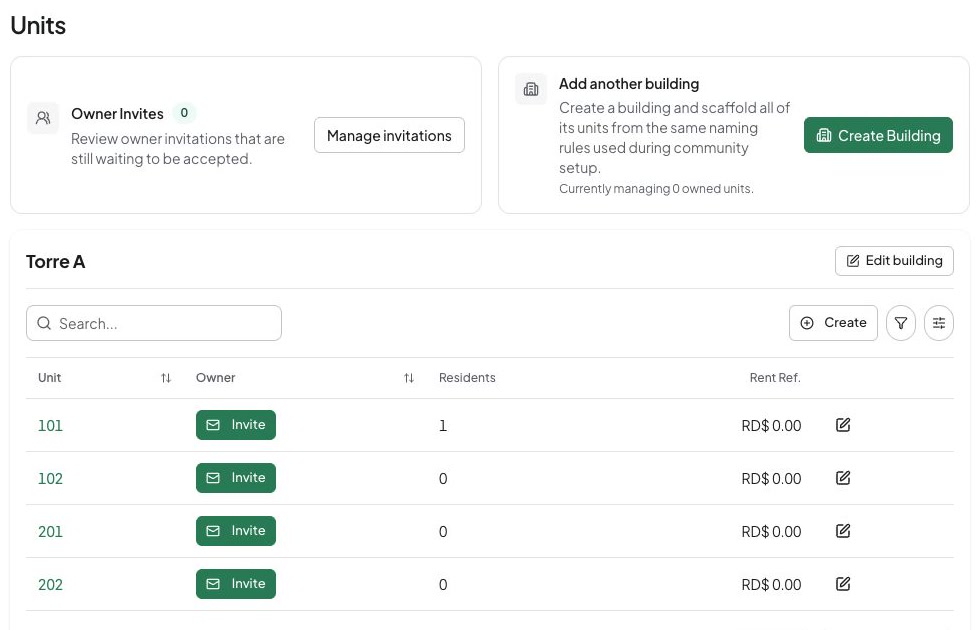
Inspect the existing Torre A records before adding another building.
The unsaved form below previews four alphanumeric units, while this exercise uses two numeric units. Check your own layout before saving.
2. Add or correct a unit
Add one confirmed unit
- In Torre B’s unit table, choose Create to open Add Unit. Confirm the building before entering values.
- Enter
103in Unit Number, select floor1in Floor, then choose Create Unit. - Check that Torre B now contains 101, 102, and 103 exactly once. Unit numbers must be unique within that building. Creating 103 does not assign an owner or resident.
Correct the building or unit details
- For a building name or floor-count correction, choose Edit building, change Building Name or Number of Floors, and choose Update Building.
- Check the saved values. Editing floor count does not regenerate existing units or create homes on new floors. It cannot reduce the count below an existing unit’s highest floor.
- Open the intended unit using its Edit action. Review the Unit, Floor, current owner display, and optional property details.
- Change only confirmed values available to you, then choose Save Changes. Structural unit fields can remain disabled even if you may edit other details; they need configuration authority.
- Reopen the unit and confirm the saved result. The current owner display is not an ownership-transfer control. For a new relationship, use the access-review workflow.
Leave optional rent and ownership-share fields blank until you can confirm them; these values can affect later work. Saving a rent reference does not record money received.
3. Prepare an employee role
To give a team member access, you need both a role with module permissions and an employee assignment linking that person to the role. Board-only roles belong to the governance workflow and cannot be used as employee roles.
- Open Team and choose Create to open Create Employee.
- Inspect Employee Role. Choose a suitable existing employee role when available. If you have role-creation authority, select Create role to open Create employee role.
- Enter a specific Role Name, such as
Maintenance coordinator. - Expand Access Permissions under Module Access. Select only the modules and actions needed for the person’s work. For a read-only maintenance coordinator, select View for Work orders; add Create or Edit only if those responsibilities are approved. Create, edit, and delete permissions require view access.
- Review each selected permission. Avoid Select all permissions unless every permission is needed. Choose Create Role.
- Confirm the new role is selected in the employee form. You still need to complete and submit that form; a created role alone does not invite Sam.
If no roles are available and you cannot create one, ask the administrator who manages roles to prepare an appropriate employee role. Do not substitute a board-only or overpowered role.
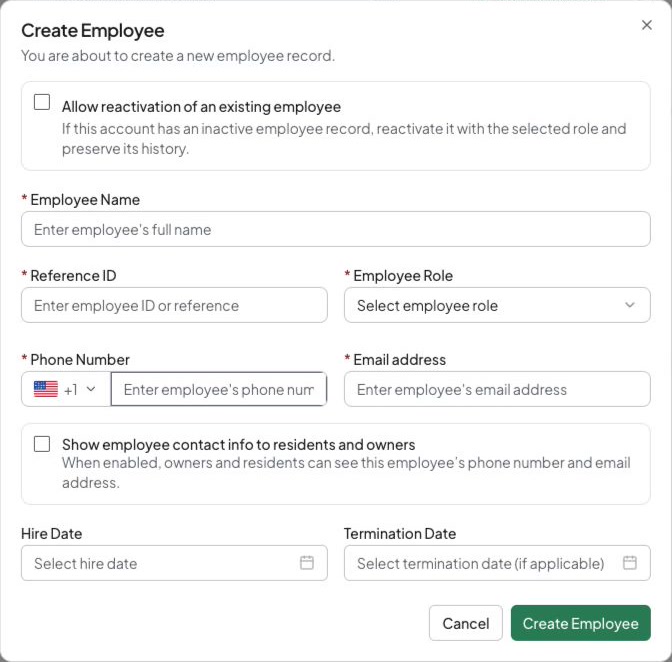
The blank form below shows the fields to review. No employee assignment or invitation has been created in this example.
4. Create the employee assignment and follow the invitation
- In Create Employee, enter Employee Name (
Sam Vegain this example), Reference ID (your real internal identifier), and the approved Employee Role. - Enter the person’s correct Phone Number and Email address. Use their established Urbira identity where applicable. For a fictional demonstration, use fictional contact details only; do not send a real invitation merely to practice.
- Review Show employee contact info to residents and owners. It is optional; enabling it makes the phone number and email visible to those audiences. Set Hire Date only when known.
- Check the community, recipient, role, and permissions one more time. Choose Create Employee once.
- Open Pending Employee Invites and find the intended recipient if an invitation is pending. A new assignment remains inactive until the invitation is completed. Check actual access after that step; a saved record or queued email does not confirm entry.
- After the recipient follows their invitation and completes required account steps, check the employee’s current active access and role. Ask them to sign in with that identity and verify the intended community and modules, without sharing credentials.
If the person is already an active employee, edit the existing record rather than create another. For an inactive prior employment record, review reactivation explicitly. Creating a duplicate does not restore that record. For someone who submitted a shared-link team request, use Review access requests to approve that specific request instead of repeating the assignment here.
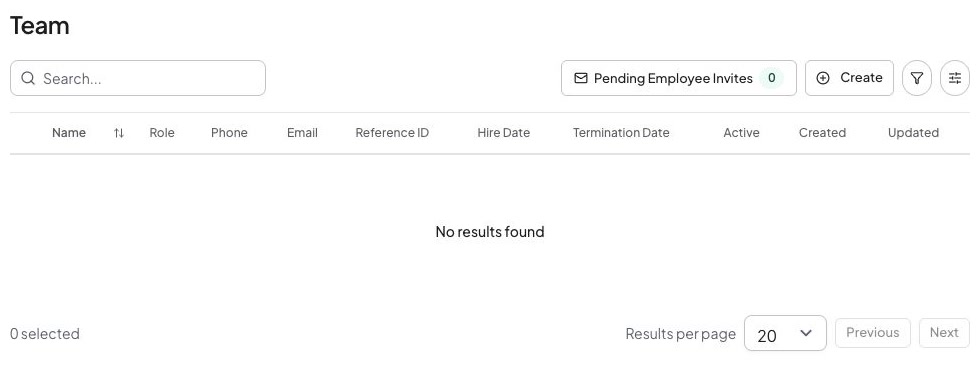
The empty team list below has creation and pending-invitation controls. It does not show an active employee assignment.
5. Maintain access deliberately
- In Team, use Edit on the existing employee to update profile or role when authorized.
- Review Community access active. Turning it off removes employee access while keeping the employee record and user account. Check the intended access before changing it.
- Before restoring inactive access, review any required reactivation acknowledgement and current role. Check dates: active employment cannot have a termination date.
- Choose Update Employee, reopen the record, and confirm the intended state and role. Changing an employee role changes what that person can do, so verify the resulting scope.
Recover without duplicating work
You closed a form. These dialogs do not use the onboarding saved-draft system. Reopen the building, unit, or employee and check what was saved before entering missing values again.
A submission or refresh failed. Check the current list and pending invitations first. The building, role, or employee may have been saved even if the page failed to refresh. Refresh the list or role choices before retrying creation. For an uncertain invitation, use the existing controls in Pending Employee Invites instead of creating another employee.
A control is missing or disabled. Check the current community, module permission, subscription status, and relevant service. Unit additions and owner invitations can have different availability rules, including owned-unit limits. Resolve the stated restriction with the account administrator.
Another person changed the record. Reload it and review current details and access before retrying. For duplicate numbers, find the existing unit and correct the intended record. If a deleted assignment is reserved, ask the administrator or support to review the existing assignment rather than reuse another email to evade the restriction.
Before finishing, check that Torre B and units 101, 102, and 103 are saved once, Sam’s role has only the intended permissions, and you know whether Sam’s invitation is pending or access is active. Verify each result separately. Continue with sharing and reviewing access for homeowners and residents.