Use your community’s link to request access, then track the decision in My requests. In this example, you rent your home in Jardines del Lago, Torre A, unit 101. Request Resident access and wait for the community to verify and approve that relationship before entering.
Choose the right starting point
Ask the community administrator for the current request link or QR code. The steps below cover that shared link on the website. It lets you apply for access; membership still requires approval. If you received a direct personal invitation, follow its instructions, which may use a different acceptance process.
Use the account associated with your community records and verify its email before submitting. You need access to that inbox. Homeowners and residents use the community manager’s subscription coverage, so joining requires no separate personal plan. Usage credits apply separately to metered services. Sending a request does not buy a plan, charge a payment, or assign a unit.
Have your exact building name, unit number, and relationship ready. You do not need administrator permissions to apply; an authorized reviewer decides the actual unit or team role and its access. If membership is pending or missing, follow up on that account rather than create another account or community.
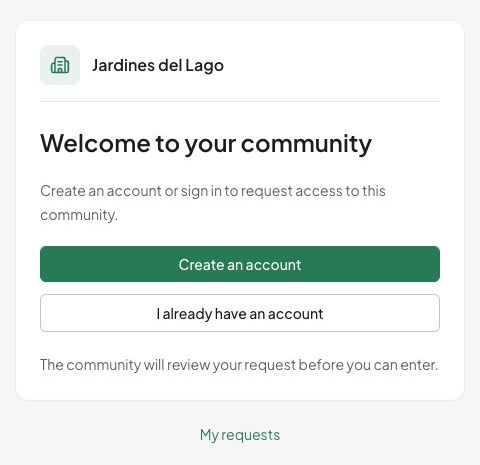
The screenshots show the current website with a fictional community and example accounts. Use your own confirmed community and unit details.
Send a request on the website
1. Open the link and check the community
- Open the administrator’s link, or scan the QR code and open its website destination.
- Check that the page names Jardines del Lago (or your intended community). If it names another community, stop and ask for the correct link.
- If you see This link is unavailable or Requests are paused, follow the recovery section below. A screenshot or an old printed QR is not proof that the link is still active.
2. Sign in or create one account
- If you already have an Urbira account, choose I already have an account and Sign in with that account. If the email is already registered, use sign-in or password recovery instead of another address.
- If this is your first account, choose Create an account and complete the account form using an inbox you can open.
- Open the verification email and follow its link. The supported continuation signs you in and returns you to finish the request. If you are not returned, reopen the same community link and sign in; use I verified my email — sign in when offered.
- Check the community name again. Verification proves control of your email; it does not submit the application or approve membership.
For a forgotten password, missing verification email, or account recovery, follow the account-access guide. If the page says Verify your email address before sending a request, complete that step before trying to send.
3. Describe your relationship
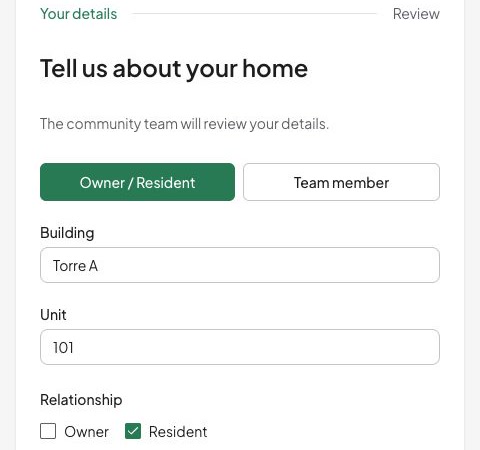
- Choose Owner / Resident. In Building, enter
Torre A; in Unit, enter101. The reviewer uses these descriptions to check your request; entering them does not grant access. - Under Relationship, select Resident for this example. Select Owner only if you own the unit. Select both if you both own and live there; make sure at least one is selected.
- If you work for the community instead, choose Team member and complete Work or team with a useful description, such as
Maintenance team. You do not assign yourself a privileged role. - Choose Review request and wait for the review screen. The reviewer will match your details to actual community records.
4. Review and send
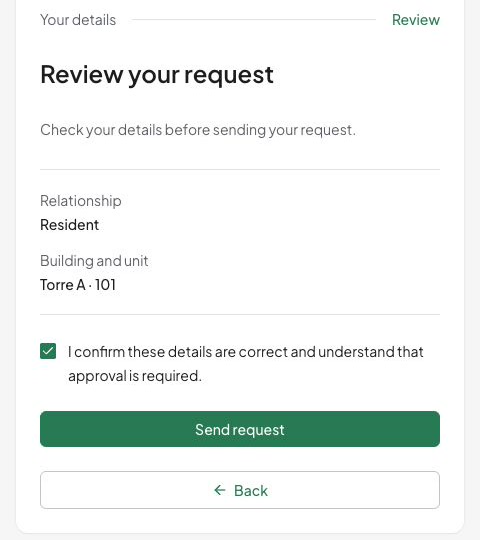
- On Review your request, check the community, relationship, building, and unit. In the example, confirm Resident, Torre A, and 101. Use Back to correct a mistake before sending.
- Read and select I confirm these details are correct and understand that approval is required.
- Choose Send request once and wait for the request detail page. Sending… is not yet a completed result.
- Check the intended community, the Pending review status, and the submission entry in Activity.
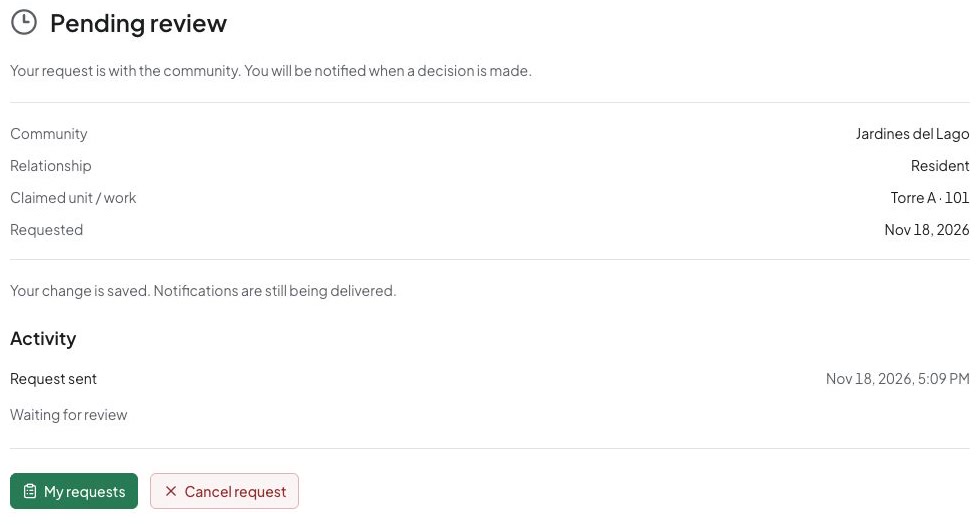
Pending review confirms that your request was sent. The community must still review it before granting membership.
Follow the result
- Open My requests in the community workspace using the same account.
- Select the request for your community. Check Request details, Activity, and its current status.
- For Pending review, wait for the decision notification. There is no fixed approval time. To ask for an update, give the administrator your building and unit instead of applying again.
- For Approved, use Open community when available. Confirm the correct community opens and that your expected unit/relationship is available. Approval on the website completes the reviewed relationship without another applicant confirmation step.
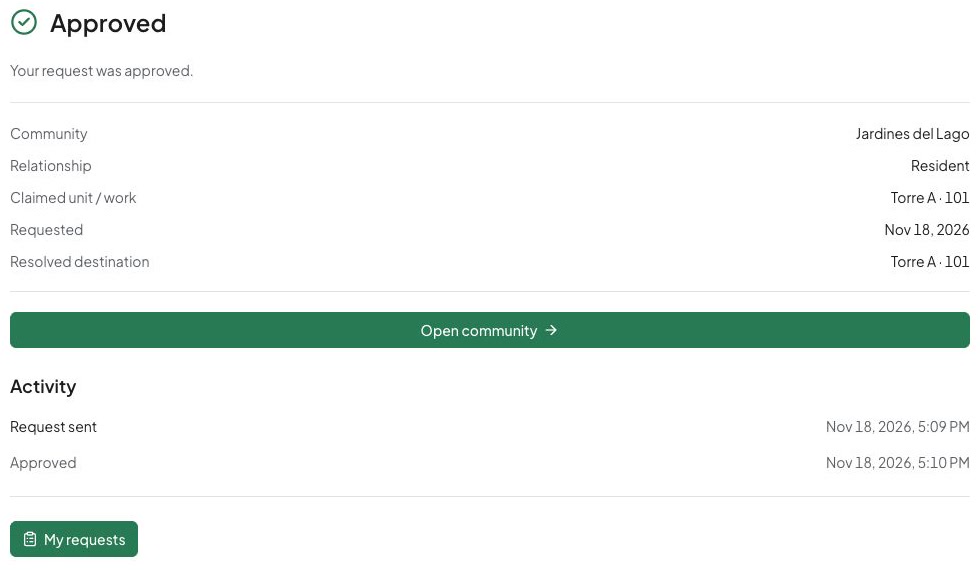
If the current Terms of Service appear before entering, review them, enter your full name, and choose Accept and continue only if you agree. This is separate from the community approving your relationship.
Access depends on your current membership and permissions, even if an earlier request says Approved. If Open community is missing or your access is unexpected, ask the administrator to check your current membership and the unit assigned during review. Approval of a move-related residency request can replace your prior residency. If this applies to you, clarify your situation with the reviewer before approval.
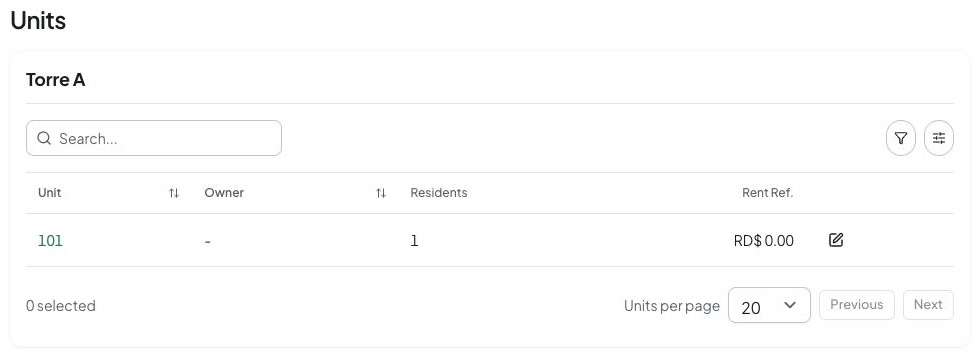
In this example, the resident’s Units page shows unit 101 with one resident. Available records and menus depend on your current roles and permissions.
| Status | What to do |
|---|---|
| Declined | The community did not approve this request. Contact it to correct a mistaken community, unit, or relationship. |
| Expired | Get an active community link and apply again when eligible. |
| Canceled | You withdrew this request. |
Creating a duplicate account does not resolve any of these states.
To withdraw a pending application, choose Cancel request, read the explanation, and choose Cancel request again in the confirmation dialog. Check that its status becomes Canceled. Cancellation withdraws this application and does not remove community access you already have.
Recover from an interruption
If you closed the page before sending, reopen the same link and sign in with the same account. The community link can help return you after verification, but the form does not save a building/unit application draft. Check the values, re-enter anything missing, then review and send when ready.
If you closed the page while sending or cannot tell whether it worked, open My requests first. If the request exists, follow that entry. If the join page says You already have a pending request, use My requests there rather than submit again. Do not assume an error means no request was stored.
If the page says the change is saved but notifications could not be queued, keep it open and choose Try again there. This finishes the existing change, so do not create another application. If you see Your change is saved. Notifications are still being delivered., the change has also happened: check its status.
If requests are paused, ask the community when it will accept new applications through the link. Existing pending applications can still be reviewed; follow yours in My requests.
If the link is unavailable, ask for the current one. Replacing a community link invalidates the old link and its printed QR codes; scanning again will not restore it.
If you cannot apply again because of an account block, contact the community directly. If you have reached a temporary attempt limit, wait before retrying. Use the same account for recovery.
If you already have the access you need, choose Open community. You can request an additional owner, resident, or team relationship for separate review; check that you need it first.
Continue from a phone
These instructions apply to the website, including a phone browser. Native join screens depend on the installed app and enabled workflows. Use the website handoff when offered. Scanning a QR code does not guarantee that it opens in the native app, and community creation remains a website task.
For supported platform differences, read mobile and website availability. To understand what the administrator checks, read review community access.